vrijdag 30 september 2016

MONTHLY 9: SEPTEMBER 2016

Bye bye September, hello October. Here are my nine favorite projects of September.


Goodie Bag (2)

Woohooo! It's Your Birthday (1)

Booyah! (1)

Seinding Smiles (1)

Happy Halloween (2)

Jump For Joy, It's Your Birthday (2)

Waving Hello (3)

You're A-Maize-ing (3)

You're Kinda Pawesome (2)

Thanks for visiting my blog. Please leave a comment and follow/ subscribe to my blog!

MERRY CHRISTMAS (4)

My first Christmas card of the year. When you send all you friends and family a hand made card, you need to start early. I used the Toboggan Together stamp set from Lawn Fawn.


I started on the background and scene. I took some watercolor cardstock and blended a sky with some Distress Inks. I used Shaded Lilac, Chipped Sapphire and Cracked Pistachio. I die cut two mountain borders with the Stitched Mountain Borders from Lawn Fawn. I also used Distress Inks to color them. I used Antique Linen and Brushed Corduroy. I added the snowy tops to it.

I stamped the images. I stamped one of the reindeer, the toboggan, stack of presents and rope. I colored the images with Copic Markers. Here are the colors I used:
Reindeer: E25 – E29/ E00 – E11/ E04/ E41 – E43
Toboggan: E71 – E77
Presents: R46 – R59/ G14 – G05 – G17


I die cut the images with my Cuttlebug. I stamped the sentiment and I also added the little swirly lines to make it look it comes from the flying toboggan. I used Soot Ink from Lawn Fawn. I adhered the mountains flat to the card. The stamped images I adhered with foam tape.

I adhered the panel to some pattern paper, from the Perfectly Plaid Winter 12x12 paper collection from Lawn Fawn. I adhered it with foam tape.


I’m very happy with my first Christmas card. I decided to make two of each Christmas card I make this year.

Thanks for visiting my blog. Please leave a comment and follow/ subscribe to my blog!

dinsdag 27 september 2016

SENDING SMILES (1)

For this encouragement card, I used the Hello Chum stamp set from Avery Elle.


I started by stamping one of the shark images and colored him with Copic Makers. Here are the colors I used:
Shark: C0 – C2 – C5/ W7


I fussy cut the image and went over to the panel. I die cut four frames, with the Stitched Square Scallop Frames from My Favorite Things. I did this four times so I could adhere them together to create a dimensional frame. I used light blue cardstock. I also kept one of the insides. For the inside I used a the Herringbone Bricks stencil from My Favorite Things and Mermaid Lagoon Distress Ink to blend the color onto the cardstock. I glued the frames together and added the inside.

I took a white cardbase and didn’t want to leave is completely white. I took three Distress Inks, some water and a paintbrush and splattered the color onto it. I used Mermaid Lagoon, Weathered Wood and Wild Honey Distress Ink. Very subtle.


I stamped the sentiment, adhered the frames and the shark inside the frame. I rounded off the two bottom corners with the We R Memory Keepers Corner Chomper and done is this card.

Thanks for visiting my blog. Please leave a comment and follow/ subscribe to my blog!

YOU'RE A-MAIZE-ING (3)

Fall has just officially began, so I created another fall themed card. I used the Happy Harvest stamp set from Lawn Fawn.


I first wanted to create the scene. I used Distress Inks for the sky. I used my mini ink blending tool to blend two beautiful colors together. I used Abandoned Coral and Spiced Marmalade. I then die cut two hills with the Stitched Hillside Borders dies from Lawn Fawn. I colored them with Distress Inks too, here I used Fossilized Amber and Scattered Straw.


I wanted the corn behind the largest hill, so I marked the hill with a pencil onto the background. I stamped the corn in Doe Ink from Lawn Fawn. I did one layer first. Then I stamped another layer. I used second generation stamping, where I ink up the stamp, then stamp it off onto some scrap paper and then onto the project. This makes the color lighter. I really love the look of this. I stamped the sentiment onto the front his and adhered the hills. The front hill with foam tape, the other flat.

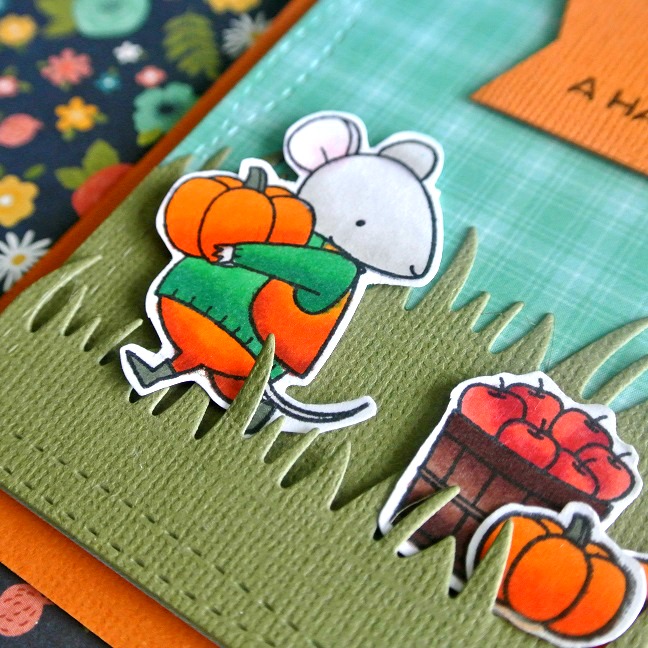
I stamped my images. I stamped the scarecrow, the large pumpkin three times, the small pumpkin twice and two of the crow. I colored them with Copic Markers. Here are the colors I used:
Pumpkins: Y38 – YR16 – YR07/ BG96
Crows: W5 – W7/ YR15
Sweater + hat: R17 – R46 – R59
Pants + band on the hat: B93 – B95
Face: E21 – E11
Nose + Stake: E25 – E29
Straws: E15
Buttons: Y02


I fussy cut all the images and adhered them to the scene. I adhered the scarecrow, the crows and the pumpkins on the front hill with foam tape. The rest flat. I adhered the scene onto some pattern paper, from the 6x6 Perfectly Plaid Fall paper pad.

I just simply can’t create bad cards with this stamp set!

Thanks for visiting my blog. Please leave a comment and follow/ subscribe to my blog!

YOU'RE KINDA PAWESOME (2)

I wanted to create a colorful card using my Zig Clean Color Real Brush Markers and the Cat-Itude stamp set from My Favorite Things.


I started by stamping two of the cats, the three fish images and the little flower repeatedly onto some watercolor cardstock, that I first die cut with the Wonky Stitched Rectangle STAX from My Favorite Things. I didn’t stamp them to close together, I wanted some space between all the images. I colored the images with my Zig Clean Color Real Brush Markers. Here are the colors I used:
Orange cat: 070
Blue cat: 031
Green fish: 041
Purple Fish: 080
Red fish: 022
Flower: 050


I adhered the card to a light grey cardbase. I stamped the sentiment onto the same cardstock as I used for the cardbase and cut it into a flag banner on one side. I adhered the sentiment banner onto the card with foam tape.

It’s a very simple card, yet different, colorful and fun.

Thanks for visiting my blog. Please leave a comment and follow/ subscribe to my blog!

donderdag 22 september 2016

BOOYAH! (1)

I made another Halloween card using the fun Booyah stamp set from Lawn Fawn.


I stamped two of the ghost and the witch hat. I also stamped the birch trees from the Joy to the Woods stamp set, also from Lawn Fawn. I colored the images with Copic Markers. Here are the colors I used:
Ghosts: C0 -C2
Witch hat: V17 – V09
Band on hat: E25 – E29
Buckle: Y02
Trees: E41 – E43


I fussy cut the ghosts and hat and die cut the trees with my Cuttlebug. Then I went over to my scene. I took some watercolor cardstock to add some Distress Ink to. I used Seedless Preserves and Chipped Sapphire and added them on with the mini ink blending tool.

I die cut two hills from brown cardstock, using the Stitched Hillside Borders from Lawn Fawn. I also die cut a moon, from yellow cardstock, with the Sun and Moon dies from Lawn Fawn. I adhered everything together. I added the front hill, the double birch tree and the ghosts onto the panel with foam tape. The rest was adhered flat. I added the panel to a purple cardbase. I heat embossed the sentiment onto the front hill with Opaque Bright White Embossing Powder fro Wow. And my Halloween card is done!


Thanks for visiting my blog. Please leave a comment and follow/ subscribe to my blog!

TRAVEL LABEL (1)

My brother is traveling to South Africa later this month and he needed a label to add to his travel bag. So I created one for him. Because he is going to work with reptiles there, I used the crocodile from the “Critters Down Under” stamp set from Lawn Fawn.


I stamped the crocodile and colored him with Copic Markers. Here are the colors I used:
Crocodile: BG93 - BG96

I die cut him with my Cuttlebug and went over to the label itself. I die cut a rectangle with the Wonky Stitched Rectangle STAX from My Favorite Things, from the Perfectly Plaid 6x6 paper pad from Lawn Fawn. I die cut another, yet smaller, rectangle from white cardstock. I wrote the words ‘name’, ‘address’, phone number’ and ‘destination’ to it. I also filled in the info, but for privacy reasons I removed them from the photo.

I adhered the rectangles together and added the crocodile to the label. I laminated the label and punched a hole into the left corner. This way it’s easy to attach to the luggage.


A very quick and easy label, to add to your luggage when you travel.

Thanks for visiting my blog. Please leave a comment and follow/ subscribe to my blog!

dinsdag 20 september 2016

WISHING YOU A HARVEST OF BLESSINGS (2)

Time for another fall themed card. I used the Harvest Mouse stamp set from My Favorite Things.


I started by stamping all the images I wanted to use. I stamped two of the mice, the two pumpkins and the basket of apples. I colored the images with Copic Markers. Here are the colors I used:
Mice: W0 – W2
Ears: RV21 – W0
Sweater: G05 – G17
Vest + pants: Y38 – YR68 – E08
Shoes: BG96
Basket: E25 – E29
Apples: R14 – R46
Pumpkins: YR18 – YR07/ BG96


I fussy cut the images and started on my background. I cut two rectangles with the Wonky Stitched Rectangle STAX from My Favorite Things. One from the Perfectly Plaid Fall 6x6 Paper Pad from Lawn Fawn, the other from some olive green cardstock. From the olive green rectangle, I die cut two grassy border with the Grassy Border die from Lawn Fawn. I used that rectangle, so that I have the wonky stitched detail around the entire card.


I adhered the two grassy borders to the plaid paper. The front border I adhered with foam tape. The I adhered the images flat, but the tops of the images are adhered with foam tape.

I stamped the sentiment onto some orange/ brown cardstock, trimmed it and then cut it into a flag banner. I adhered it with foam tape to the card. I adhered the entire panel to a cardbase from that same orange/ brown cardstock.


I really like this scene, the plaid paper and the stitching detail around the panel.

Thanks for visiting my blog. Please leave a comment and follow/ subscribe to my blog!

zaterdag 17 september 2016

GOODIE BAG (2)

To stay within the Halloween theme, I created some goodie bags for Halloween, with the Goodie Bag die and the Booyah stamp set from Lawn Fawn.


I started by die cutting the goodie bag twice, from Let’s Polka in the Meadow paper from Lawn Fawn. I assembled the goodie bags, which is very quick and easy.

I stamped two of the ghost, turning one of them into a witch and the other into the Frankenstein monster. I added some accessories and faces to them and colored them with Copic Markers. Here are the colors I used:
Ghosts: C0 – C2
Witch’s hat: V00 – V09/ W2 – W5/ Y17
Broom: E15 – E25/ E43
Monster of Frankenstein’s hair: W5 – W7
Treat bag: YR16 – YR07
Bolts: G14


I fussy cut the ghost and then went over to completing the project. I die cut two scalloped circles, with the Scalloped Circle Stackables from Lawn Fawn, from some orange cardstock. I also die cut two circles with the Double Stitched Circle STAX from My Favorite Things. I added the circle to the scalloped circle and adhered the ghosts onto the circles with foam tape. I also added the speech bubble with boo inside. I adhered the circles to the goodie bag.

To finish it off, I added some green/ white twine to the bag, to close it. These bags are fun to put some sweet Halloween treats inside.


Thanks for visiting my blog. Please leave a comment and follow/ subscribe to my blog!

HAPPY HALLOWEEN (2)

I saw this cool Halloween card created by Kelly Marie Alvarez, from Lawn Fawn. I decided to recreate this with the Monster Mash stamp set from Lawn Fawn.


I started by die cutting some hills with the Stitched Hillside Borders. I applied Distress Ink on all the hills. I used, from top to bottom: Black Soot, Pine Needles, Mowed Lawn and Old Paper. For the sky I used Seedless Preserves. I stamped some trees in Versafine Onyx Black Ink, using the two tree stamps from the Love You S’More stamp set from Lawn Fawn. I heat embossed the sentiment, from the Booyah set, with Opaque Bright White Embossing Powder from Wow. I then assembled everything and added it to a black cardbase.


I stamped all the monsters from the set and colored them with Copic Markers. Here are the colors I used:
Small one eyed monster: BG22 – BG49
Big one eyed monster: YR16 – YR07
Ghost: BV02 – BV13
Three eyed monster: R14 – R29 – R59/ BV05 – B05/ C5
Monster with double pointed head: Y08 – Y17
Winged monster: YR61 – YR02/ G14 – BG49


I fussy cut all the images and adhered them flat to the card, making them peek out of the hills. I added some Glossy Accents to the eyes of the one eyed monsters. And that is my Halloween card.

Thanks for visiting my blog. Please leave a comment and follow/ subscribe to my blog!

woensdag 14 september 2016

HAVE A BEARY AMAZING DAY (1)

For the Lawnscaping Challenge the task was to add texture to your project. I used it in two different ways. I used the Dad + Me stamp set from Lawn Fawn.


I started on my scene. I die cut a frame from textured cardstock. The scene I wanted inside that frame. I die cut two mountain borders with the Stitched Mountain Borders die from Lawn Fawn. I used two different Distress Inks to color them. I used Walnut Stain and Brushed Corduroy. I added water droplets to it, to add a distressed look. This is the second way I’m adding texture to the card. I also die cut the snowy caps for the mountains as well as grass with the Grassy Border die from Lawn Fawn. I colored the grass with Mowed Lawn and Pine Needles Distress Ink. I added water to this as well. For the sky I used Mermaid Lagoon Distress Ink and I did the same water technique here.

I stamped the images and colored them with Copic Markers. The water and the plants I stamped in Lawn Fawn Inks. Here are the colors and inks I used:
Bears: E25 – E29/ E43
Hat: BG93 – BG96/ B00 – B02
Water: Fish Tank Ink
Plants: Noble Fir Ink and Doe Ink


I fussy cut the images and started assembling the card. I adhered the scene together and added it onto a green cardbase. The textured frame I adhered with foam tape. The water, bears and sentiment I also adhered with foam tape, the rest flat. To add a little bit more dimension, I added a white dash line around the frame.


Please check out the Lawnscaping Challenge.


Thanks for visiting my blog. Please leave a comment and follow/ subscribe to my blog!

maandag 12 september 2016

GOODIE BAG (1)

I got the Lawn Fawn Goodie Bag die from a crafter online, who didn’t use the die anymore. I used it for the first time, to create a goodie bag for a gift card that I’m going to give to a friend of mine.


I die cut the goodie bag twice, from some kraft cardstock. I adhered it and it’s really easy to assemble. I die cut an orange rectangle with the Double Stitched Rectangle STAX from My Favorite Things. And also a circle from Let’s Polka in the Meadow paper, with the Double Stitched Circle STAX.

I stamped the owl image from the Jump For Joy stamp set, from Lawn Fawn and colored him with Copic Markers. Here are the colors I used:
Owl: E25 – E29/ E41 – E43
Beak + feet: YR02


I fussy cut the owl and adhered it to the die cut circle with foam tape. I adhered the circle flat to the rectangle and the rectangle to the goodie bag. I out the gift card inside and closed the goodie bag with some white/ yellow twine.


A fun and easy way to jazz up your gift.

Thanks for visiting my blog. Please leave a comment and follow/ subscribe to my blog!

donderdag 8 september 2016

JUMP FOR JOY, IT'S YOUR BIRTHDAY (2)

I made a slider card using the Jump For Joy stamp set from Lawn Fawn.


First I die cut a rectangle with the Double Stitched Rectangle STAX from My Favorite Things. I also die cut some grass with the Grassy Border die from lawn Fawn. This is going to be the base of my scene.

I stamped the images. I used the hedgehog, pile of leaves and some of the separate leaves. I colored them with Copic Markers. Here are the colors I used:
Red leaves: R46 – R59
Orange leaves: YR15 – YR07
Yellow leaves: Y15 – Y38
Brown Leaves: E25 – E29
Hedgehog: E25 – E29/ E41 – E43


I fussy cut all the images and went over to the slider part. I die cut a slider section with one of the Slide On Over dies from Lawn Fawn. I added the hedgehog to it, with a penny underneath and adhered with double foamtape. I added the grass and the pile of leaves flat and the other leaves with foam tape. I stamped the sentiment. The first part I heat embossed with Opaque Bright White Embossing Powder from Wow. The bottom part of the sentiment I stamped with Versaine Onyx Black Ink. I adhered the panel with a double layer of foam tape to some pattern paper, from the Perfectly Plaid Fall 6x6 paper pad from Lawn Fawn. Then I adhered the panel to a blue cardbase.


Such a cute interactive card and so fun to make!

Thanks for visiting my blog. Please leave a comment and follow/ subscribe to my blog!