maandag 28 december 2015

HAPPY HOME (1)

Today I made a non-Christmas card, with a Christmas stamp set. I wanted to make a card for my cousin Linda and her girlfriend, who just moved into their new home. I used the Joy to the Woods stamp set from Lawn Fawn.
 
 
I only used one stamp from the set, the little bird house. I repeatedly stamped it to create a pattern, with Memento Tuxedo Black Ink. Then I colored them with Copic Markers. Here are the colors I used.
BG13 – BG23 – BG49/ R11 – R22 – R35

The heart shape in the houses I colored with a Uni-ball silver gel pen. I wanted one of the houses to stand out, so it looked like that’s their house. I cut a piece of vellum and die cut a circle with my Cuttlebug. So when I place the vellum over the colored panel, one house is in the ‘spotlight’.
 
 
I wanted to heat emboss the sentiment on the vellum, with some Silver Embossing Powder from Ranger. Because vellum warps pretty quickly while heat setting it, I made sure the heat tool was hot before taking it over to my vellum. This way the embossing powder melts very quick without any warping of the vellum. I created the word home with Violet’s ABC’s from lawn Fawn.
 
 
I cut a border from some pattern paper. I used the 6x6 paper pad from Cottage Living by Jen Hadfield (Pebbles). I adhered the border the vellum and then the entire panel to a dark blue card base.

As a finishing touch I die cut some hearts and colored them silver with the Uni-ball gel pen and added them next to the sentiment.

I’m really happy with this card, thinking out of the box. That’s what I love about Lawn Fawn, you don’t necessarily need to use a Christmas themed stamp set just for Christmas cards.

Thanks for visiting my blog. Please leave a comment and follow/ subscribe to my blog!


VAYÈN (1)

Today’s card I made for a very special little girl: Vayèn. She is turning 1 on December 30th and she is my best friend’s daughter. I wanted to make a special birthday card for her. I used the Cat-Itude stamp set from My Favorite Things.
 
 
The set comes with five cats and I wanted to use all five of them. I lined them up, so I could see which cat was in front and which one was in the background. This way I could also see which cat I had to mask off. I started with the two smallest cats, because they were the only two ones I had to mask off. I always use post it notes as masks.

I wanted all the cats to hold a balloon. I used the balloon from the Adorable Elephants stamp set, also from My Favorite Things. I only used the balloon, not the string. I drew the strings myself, so I could make them more playful and wrap them around the cat’s tails. I did this with a black Sakura Micron Pen

I then stamped the letters of Vayèn’s name into the balloons using Violet’s ABC’s from Lawn Fawn. I stamped all the images with Memento Tuxedo Black Ink, because I wanted to color them with Copic Markers. Here are the colors I used:
First cat: E71 – E29 – E77 – E11 – E35
Collar + balloon: Y02 – Y08 – Y17
Second cat: W0 – W2 – W5
Collar + balloon: BG01 – BV05 – B05
Third cat: E11 – E25 – E35
Collar + balloon: R35 – R46 – R59
Fourth cat: W2 – W5 – W7
Collar + balloon: BV000 – BV02 – BV13
Fifth cat: Y21 – YR14 – E08 (sounds like a weird combo, but with a little experimenting this cat got the exact color I was hoping for)
Collar + balloon: YG03 – G05 – G14
Ears: R11
 
 
The color was a lot of work, but I was worth it. I think the colors are amazing!

I adhered the entire panel to some pattern paper with foam tape. I used the Shimelle (True Stories) 6x6 paper pad by American Crafts. That completed panel I adhered to a white card base.

I added some Wink of Stella to the balloons and then also some Glossy Accents from Ranger. I love to use this on balloons. Last I put some white dots on the cat’s cheeks with my white Uni-ball gel pen and used W0 and W2 Copic Markers to create a shadow on the ground.
 
 
And there you have my card for Vayèn. It was very time consuming, because there is so much coloring involved. But a special girl gets a special card!

Thanks for visiting my blog. Please leave a comment and follow/ subscribe to my blog!


vrijdag 18 december 2015

WISHING YOU TONS OF FUN (1)

I had this great idea with the Adorable Elephants stamp set from My Favorite Things. It’s such a fun and varied set.
 

I wanted to use one of the elephants and the balloon. I stamped the elephant and then the balloon nine times. I used Memento Tuxedo Black Ink. I colored them with Copic Markers. Here are the colors I used.
Elephant: W0 – W2
Ears: RV02 – W0
Yellow balloons: Y02 – Y08 – Y17
Red balloons: R22 – R35 – R46
Green balloons: YG03 – G05 – G14

I die cut the images with my Cuttlebug.
 
 
For the background I used Distress Inks. I blended two colors on some Tim Holtz water color cardstock with my mini ink blending tool. I started with Salty Ocean and then went over the top with Chipped Sapphire.

I wanted to create clouds for the background and I decided to use Ranger Texture Paste. I placed a cloud stencil from Dutch Doobadoo over the paper and spread the texture paste over the stencil with a pallet knife. It’s really hard to get it all evened out, but with a little patience it will work fine.
 
 
When the texture paste dried, I added the elephant and balloons to the background. I stamped the sentiment with Versafine Onyx Black Ink and heat embossed it with Clear Silver Highlights Embossing Powder from Wow. I cut it into a flag banner and adhered it down to the panel as well.

The front panel was adhered to a green card base and I rounded off the two top corners with my We R Memory Keepers Corner Chomper. To finish it off, I added some Wink of Stella clear glitter to the balloons.

Thanks for visiting my blog. Please leave a comment and follow/ subscribe to my blog!


zondag 13 december 2015

FLOOR

I saw the new release for My Favorite Things and I just couldn’t resist. I ordered the set Adorable Elephants and it is indeed adorable. I made a baby card with the set.
 
 
I started to stamp one of the elephants on some Tim Holtz water color cardstock (I cut it into a square first), with some Versafine Onyx Black Ink. I wanted to water color it, so this is the perfect ink for that.

I started water coloring with Distress Inks and I actually only used two colors: Weathered Wood and Spun Sugar.
 
 
After I water colored the entire panel I adhered it to a pink card base. I added some black thickers from American Crafts to it, spelling the name of the girl that was born (it's a typical Dutch name). A added some Wink of Stella to the letter for some glitter and that’s it. A very simple yet pretty baby card.

I just love this set and I will be using it a lot!

Thanks for visiting my blog. Please leave a comment and follow/ subscribe to my blog!


vrijdag 11 december 2015

HIP HURRAY CONFETTI (1)

Sometimes when you order stamps, inks or other crafty things, the company you ordered from sends you a little gift. I got this cute little stamps set, Let’s Party, with some fun party sentiments. It’s from the Dutch company Marianne Design. I got a great idea already when I first saw the set.
 
 
I wanted to create a background with Tim Holtz Distress Inks. I die cut some circles with the Double Stitched Cirlce STAX from My Favorite Things and ran them through my Cuttlebug. I didn’t use the circles, I can use them for another card, but I wanted to use the negative space as a stencil. I choose to use three sizes. The smallest I hand cut.
 
 
I used Tim Holtz water color cardstock as my front panel. I started to apply Distress Inks with my mini Ink Blending tool. Here are the colors I used:
Shaded Lilac, Wild Honey, Peacock Feathers and Worn Lipstick.

I sometimes overlapped circles and I love the look of it. I stamped the sentiment with some Versafine Onyx Black Ink. I combined two of the sentiment from the set and I think they are perfect for this card.
 
 
I added the panel to a pink card base, this pink is similar to the Worn Lipstick Distress Ink. I rounded off the top corners with my We R Memory Keepers Corner Chomper. And there is my card. Very simple, but I love it! I will definitely be making more of those with different colors of Distress Ink.

Thanks for visiting my blog. Please leave a comment and follow/ subscribe to my blog!


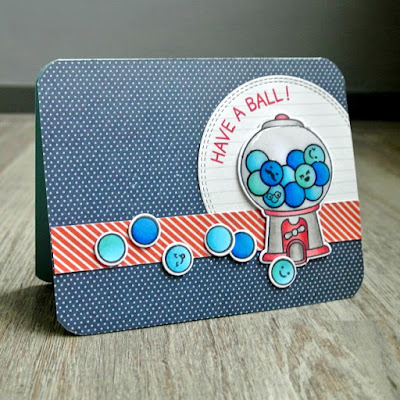
HAVE A BALL! (1)

I’ve had this Lawn Fawn set for a while, but haven’t used it for my blog yet. It’s the Sweet Smiles set and it’s such a fun set.
 
 
I stamped the gumball machine and the gumballs first, with Memento Tuxedo Black Ink. I colored them with Copic Markers and here are the colors I used:
Gumball machine: W2 – W5/ R22 – R46
Gumballs: BV05 – B28/ BG01 – BV05/ BG01 – BG13 – BG23

I die cut all the images with the coordinating dies and ran them through my Cuttlebug.

I wanted to create a background with some pattern paper and I reached for the Shimelle (True Stories) 6x6 paper pad by American Crafts. All papers I used on this card are from this paper pad. The circle I die cut with the Double Stitched Circle STAX from My Favorite Things. I just love the double stitched borders it gives the paper.

I adhered all the pattern paper to a light blue card base. The gumball machine and the gumballs were adhered with foam tape. I wanted the gumballs to look like they were rolling out of the machine. I also added some of the cute smiley faces from the stamp set to a couple of the gumballs.
 
 
The sentiment was stamped with Lobster Ink from Lawn Fawn. I curved the stamp, so I could stamp it in the same shape as the circle and top of the gumball machine. That’s a great thing about clear stamps, they are very flexible.

I added some Wink of Stella to the window of the gumball machine and the gumballs. I than also put some Glossy Accents from Ranger on the window, so it actually looks like glass. I hope you can see it in the pictures, because it looks really pretty. As a finishing touch I rounded off all the corners with my We R Memory Keepers Corner Chomper.
 
 
Again a fun card, this time with the Sweet Smiles stamp set from Lawn Fawn.

Thanks for visiting my blog. Please leave a comment and follow/ subscribe to my blog!


donderdag 10 december 2015

YOU COLOR MY WORLD (1)

One thing I love about Lawn Fawn is that they also have some smaller, inexpensive stamp sets. Like all sets of this company you can do so much with it. I recently purchased the mini set Color My World and I already had a great idea for this set.
 
 
I wanted to create a border with the crayon. I cut a rectangle and drew a border on with a pencil. I stamped the crayon all around the border. Sometimes I had to mask the images, because it had to look like the crayon was behind another crayon. I stamped with Memento Tuxedo Black Ink.

I colored the crayons with Copic Markers. Here are the colors I used:
Orange crayon: Y15 – Y17 – YR68
Red crayon: R22 – R35 – R46
Yellow crayon: Y02 – Y06 – Y08
Green crayon: YG03 – G05 – G14
Blue crayon: BG01 – B05 – BV05
Purple Crayon: BV000 – BV13 – BV17
Pink crayon: RV02 – R04
 
 
It was pretty time consuming, but so much fun to color all these crayons. I wanted to cut a window out of it, so I cut around all the crayons on the inside of the panel. I put some acetate on the back of the window, but I didn’t want to make a shaker card.

I got a black card base and stamped the sentiment on it with some Versamark Ink. I heat embossed it with Opaque Bright White Embossing Powder from Wow.

I adhered the front panel to the card base with some foam tape. I used a double layer of foam tape, so it’s extra dimensional. I also added some Wink of Stella to the ovals on the crayons for some glitter. And that’s my card.

Thanks for visiting my blog. Please leave a comment and follow/ subscribe to my blog!


dinsdag 8 december 2015

HOPE YOUR BIRTHDAY IS UNFORGETTABLE (2)

It’s time for something other than Christmas cards. I made enough this year to send to my family and friends. So, time for a birthday card. I used the Ella & Friends stamp set from Mama Elephant. I just love this set!


I started on the background. I used Tim Holtz water color cardstock and wetted the entire paper with a paint brush. I then added some Distress Inks to it. I started with Scattered Straw and added Mustard Seed, Wild Honey and Spiced Marmalade. I went over them several times so that all the colors would blend. I dried it with my heat tool and then dropped some water droplets on to it with a paint brush. I left the drops on for a few seconds and then dapped them off with a paper towel. I love using this technique and the Distress Inks are perfect for that. You just can’t achieve this with regular water colors.
 
 
I put the background aside and started on the images. I stamped the elephant, hedgehog, mouse, bunny, party hat and little umbrella. I stamped them in Memento Tuxedo Black Ink. I colored them with Copic Markers and here are the colors I used:
Elephant: W0 – W2 – W5
Bunny: W2 – W5 – W7
Hedgehog: E71 – E77/ E11 – E21
Mouse: W0 – W2
Party hat: Y02 – Y07 – Y15 – Y17
Umbrella: Y17 – YR68 – R22 - R46


When the background was completely dry, I added all the images to the panel with some foam tape. I covered the party hat and umbrella with some clear glitter with my Wink of Stella. I stamped the greeting with Lawn Fawn Lobster Ink. I decided to make a side folding card for a change and added the panel to an orange card base. I rounded off the bottom right corner with my We R Memory Keepers Corner Chomper.

Fun and easy card, such a great stamp set!

Thanks for visiting my blog. Please leave a comment and follow/ subscribe to my blog!

maandag 7 december 2015

HOLIDAY SMILE (1)

I saw this card once, where critters where stamped like they were taking a selfie together. It looked like a polaroid picture. I wanted to try that too for a Christmas card and used the Critters in the Arctic set again, from Lawn Fawn. I used all the animals in the set.
 
 
I first cut a rectangle from some white cardstock. I drew a square on it with a pencil, these are guidelines for me where to stamp the images. It’s the photo part of the polaroid. I cut another rectangle where I cut that square out. This I will later place over the other. To make sure the images won’t go over the lines, I masked it off with some post its. I also cut masks for all the critters.

After I stamped all the animals, I put the masks on all of the images so I could blend the background. I started with some Peacock Feathers Distress Ink and later I added Evergreen Bough. Then I took all the masks off.

I started to color the critters with Copic Markers. Here are the colors I used:
Owl: W2 – W5 – W7
Beak: Y17
Moose: E71 – E77
Antlers: W0 – W2 – W5
Narwhal: W0 – W2 – W5
Bunny: W5 – W7 – BV29
Scarf: R22 – R46
Walrus: E15 – E35 – E77/ E11 – E21
 
 
I added the polaroid frame over the colored image. I stamped the sentiment with Lobster Ink from Lawn Fawn. The word ‘holiday’ I created with the letters from Violet’s ABC’s, also from Lawn Fawn. The word ‘smile’ is from the Critters in the Arctic set. I added some Wink of Stella to the polaroid frame and some white dots to the background with my White Uni-ball gel pen.

I wanted to use some pattern paper for the background of the card. I used the 6x6 paper pad from Cottage Living by Jen Hadfield (Pebbles). I adhered the polaroid with some foam tape and the entire panel to a light grey card base. I rounded the bottom corners off with my We R Memory Keepers Corner Chomper.
 
 
I really love this card, I will send it to one of my friends.

Thanks for visiting my blog. Please leave a comment and follow/ subscribe to my blog!


WARM HOLIDAY WISHES (3)

I was in the mood for water coloring, so that’s exactly what I did. I used the Winter Owl stamp from Lawn Fawn. Such a cute stamp which you can use in so many different ways.
 
 
I stamped the owl multiple times on some Tim Holtz water color cardstock, with Versamark Ink. I then heat embossed it with Opaque Bright White Embossing Powder from Wow. I used Distress Inks to water color the images. Here are the colors I used:
Owl: Brushed Corduroy and Scattered Straw
Scarfs: Seedless Preserves, Shaded Lilac and Spun Sugar
Beak: Wild Honey
Background: Weathered Wood
 
 
I really like how this turned out. After the panel dried completely, I added it to some vellum and then I adhered it all to some fuchsia cardstock with foam tape. I cut a flag banner from some white cardstock and I stamped the greeting on it. This is from Avery Elle. I stamped the greeting with Juice Box Ink from Lawn Fawn.

As a finishing touch I added some Wink of Stella to the scarfs and the fuchsia border.
 
 
Although the water coloring was pretty time consuming, I will be making more cards like this. It looks very pretty.

Thanks for visiting my blog. Please leave a comment and follow/ subscribe to my blog!


zaterdag 5 december 2015

IT MOOSE BE CHRISTMAS (1)

I just love creating cards with the Critters in the Arctic set from Lawn Fawn. The stamps are perfect for Christmas cards! I only used the moose for this one, because I had this cute sentiment in mind.
 
 
I took some white cardstock and stamped the moose on it with Memento Tuxedo Black Ink. I also stamped the sentiment. The ‘it moose be’ is from the Critters in the Arctic set. I actually says ‘it moose be love’, but I masked the word love. I added Christmas to it, using Violet’s ABC’s, also from Lawn Fawn. I stamped it in Versmark Ink and heat embossed it with Silver Embossing Powder from Ranger. I also drew some hills with a pencil.
 
 
I wanted to color the entire front panel with Copic Markers, even the background. This is something I usually don’t do, because you use so much ink. Here are the colors I used:
Moose: E71 – E77
Antlers + hooves: W2 – W5
Sky: BV000 – BV02 – BV13 – BV17 – BV29
Snowy hills: W0 – W2 – W5

For the sky, I started with coloring the entire sky with the lightest color (BV000) and then I added the darker color and the next darker color and so on. You really have to build it up and keep coming back with all the colors to blend them all together. It takes some time, but it’s worth it because I really like how this background turned out.
 
 
When I did all the coloring, I wanted to add something more to the top and bottom. I added a silver border. I heat embossed some Silver Embossing Powder from Ranger on to some white cardstock. I adhered them together and then added the panel to a purple card base.

As a finishing touch I added some clear glitter with my Wink of Stella Clear Glitter Brush to the moose. I also put some white dots to the sky, with my Uni-ball white gel pen. This makes it looks like snow is falling down. I also add some bigger and some small dots. The edges I all rounded off with my We R Memory Keepers Corner Chomper.

A card with a lot of Copic coloring, but I think it’s a pretty Christmas card.

Thanks for visiting my blog. Please leave a comment and follow/ subscribe to my blog!


vrijdag 4 december 2015

LET IT SNOW (3)

The Ice Skate stamp from Hot off the Press also has two pretty snowflakes images. I used the big one for this card. It’s fairly simple, easy and quick to make.
 
 
I took some light blue cardstock and trimmed it. I cut it diagonally and decided I wanted to use both ends of the cardstock. I stamped the snowflake with Versamark Ink and then heat embossed it with Silver Embossing Powder from Ranger.
 
 
I stamped the sentiment, with the letters from Violet’s ABC’s from Lawn Fawn, with the Lawn Fawn Mermaid Ink on some white cardstock. I adhered the heat embossed panel to the white cardstock with foam tape. The entire panel was adhered to a white card base.

As a finishing touch I added some silver sequins and rounded of the two bottom corners with the We R Memory Keepers Corner Chomper.
 
 
This is a fun, easy and quick Christmas card to make.


woensdag 2 december 2015

WARM HOLIDAY WISHES (2)

I made another Christmas card with the Penguin Greetings stamp set by Avery Elle. This time a little different, the idea just popped into my head!
 
 
I first cut out a circle out some white cardstock. You could use a circle die, but I don’t have one. I drew the circle onto another piece of white cardstock, so I knew where to stamp the penguins. I wanted to stamp them in a circle, so it looks like they are looking through a window. I stamped them in Memento Tuxedo Black Ink.

I colored the penguins with Copic Markers. Here are the colors I used:
Penguins: W0 – W2
Scarfs + earmuffs: BG01 – BG13 – BG23/ BV000 – BV02 – BV13
Sweaters: Y02 – Y06 – Y08/ BV02 – B13 – BV17
Hats: Y02 – Y06 – Y08/ BV02 – B13 – B17/ BG01 – B05 – BV05
VestBG01 – B05 – BV05
Beaks: YR15
Background: BV05 – B05 – B18 – B28
 
 
I think the coloring turned out great. I added some clear glitter with my Wink of Stella Clear Glitter Brush Pen to the blue in the circle and also some white dots with a white Uni-ball gel pen.

I adhered the cardstock with the circle onto the Copic colored panel and the entire panel was adhered with foam tape to some aqua cardstock. I die cut the word ‘warm’ three times and put them together. This gives it a bit more dimension. I used some Peacock Feathers Distress Ink to give it some color. I adhered it to the card and also stamped the rest of the seniment with some Mermaid Ink from Lawn Fawn.
 
 
The finish it all off, I added some Ranger Glossy Accents to the word warm. This is one of my favorite holiday cards of 2015. This is going to be send to someone special!

Thanks for visiting my blog. Please leave a comment and follow/ subscribe to my blog!