dinsdag 27 december 2016

IT'S YOUR BIRTHDAY STRIKE UP THE BAND (3)

I need more birthday cards, so I created one with the Strike Up the Band stamp set from My Favorite Things. I made it for the MFT Color Challenge.


I started by stamping four of the bunnies onto some cardstock and I colored them with Copic Markers. Here are the colors I used:
Bunnies: C0 – C2
Ears: E00 – C0
Instruments: YR00 – YR61 – YR02
Uniforms: YG41 – G02/ B02 – B05


I fussy cut all the images and went over to the background. I kept that fairly simple. I trimmed a rectangle and added some stitched lines to the bottom and top edges, with the Stitched Borders dies from Lawn Fawn.

I stamped the sentiment in Fish Tank Ink from Lawn Fawn and also added some musical notes to the white card panel. I stamped those in Manatee Ink, also from Lawn Fawn. I adhered the bunnies with foam tape and then adhered the panel to a peach colored cardbase, also with foam tape.


Please make sure to check out the Sketch Challenge on the MFT Blog.


Thanks for visiting my blog. Please leave a comment and follow/ subscribe to my blog!

I LOVE YOU A BUSHEL AND A PECK (1)

For this love card, I used the Harvest Mouse stamp set from My Favorite Things. I made it for the MFT Sketch Challenge.


I started by stamping one of the mice and the bucket of apples. I colored the images with Copic Markers. Here are the colors I used:
Mouse: E41 – E43
Ear: E02
Sweater + shoes: G02 – YG41
Pants: E25 – E29
Apples: R17 – R46
Bucket: E25 – E29


I fussy cut the images and went over to my background. I die cut a rectangle with the Wonky Stitched Rectangle STAX from My Favorite Things. I applies a little bit Distress Ink onto the middle of the panel, with the color Cracked Pistachio. This color coordinates with the sweater the mouse is wearing.

I stamped the sentiment onto some black cardstock, with Versamark Ink. I heat embossed it with Opaque Bright White Embossing Powder from Wow. I cut the cardstock into a flag banner and added some dash lines onto it with a white gel pen.


I adhered the sentiment and the two stamped images with foam tape. The panel I adhered to a plaid background, from the Perfectly Plaid collection by Lawn Fawn. I adhered this with foam tape as well. The entire card was adhered flat to a white cardbase. As a finishing touch I stamped some of the leaf images onto the background.

Please make sure to check out the Sketch Challenge on the MFT Blog.


Thanks for visiting my blog. Please leave a comment and follow/ subscribe to my blog!

donderdag 22 december 2016

MY FAVORITE CRAFT SUPPLIES 2016

This year I bought or received a lot of new craft supplies. I decided to pick my favorites for 2016. The supplies weren't necessarily released in 2016, they are just the ones I got this year. Here are my favorite craft supplies for 2016:

STAMPS:

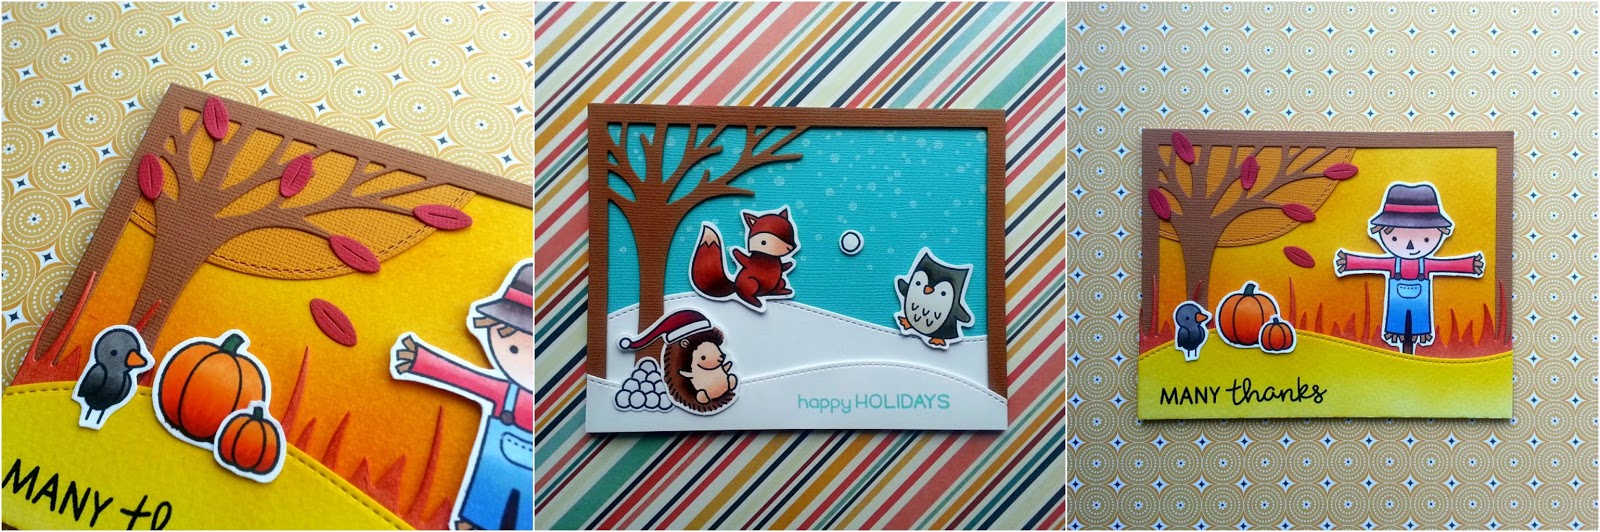
Happy Harvest (Lawn Fawn)
I think this is my absolute favorite of the year. I just love the fall, so this is a perfect set for me. I especially love the scarecrow image. He is so much fun to color. And this set is very good to create fall scenes with.


Booyah (Lawn Fawn)
Halloween is not a holiday we really celebrate in The Netherlands, but I really enjoy horror movies though. So I make my own Halloween party here ;). This Booyah set is just to die for. It has three different ghost images and you can dress them up as many different horror characters. Dracula for instance or a witch. But also Frankenstein and his bride. There are also some less scary dress ups, like a cat and a pirate. I'm definitely going to use this next Halloween.


Santa’s Elves (My Favorite Things)
I actually wanted this last year, but it kept going out of stock. I finally got my hands on it this year and I love those elves. There are three different elf images and they are so much fun to color. I created some really cool cards with this set.


Snow Cool (Lawn Fawn)
I adore penguins and I already owned the Toboggan Together stamp set. The Snow Cool set coordinates with it perfectly (so does the Cheery Christmas set, but I didn't get that one). My favorite part is the snowy background stamp, which is perfect to create a snow sky with. And those penguins are way too adorable.


Tiny Heroes (Mama Elephant)
I made a lot of cards with this set. I just love those little superheroes, especially with all those superhero movies coming out. There is also a superhero dog and cat in the set. Really fun to color and those sentiments are super fun!


Merry Messages (Lawn Fawn)
This set was a birthday gift from my friends and I think this is my most used set for this year's Christmas cards. It has so many great Christmas sentiments and they are very original.


Boom Bots (Paper Smooches)
I didn't use it recently, but the Boom Bots set is a stamp set I used a lot at the beginning of the year. Mostly for love themed cards. And with Valentine's Day coming up, I will probably use it again in January/ February. Great set!


DIES:

Stitched Mountain Borders (Lawn Fawn)
This die set is a perfect scene setter, for outdoor themed cards. I used it on both Christmas card as on other traditional themed cards like birthday cards and thank you cards. I like the snow caps that come with it.


Stitched Hillside Borders (Lawn Fawn)
This is deifinitely my most used die set of the year. Those hills are perfect for any scene. I used it to create grassy hills, snowy hills and even water and ice. Very versatile and an essential item for any paper crafter.


Hot Cocoa Cups (My Favorite Things)
This is also an item that went out of stock often I I didnt get my hands on untill this year. I really enjoy working with these dies, that are stand-alonde dies. it creates two mugs, that you can put coffee, tea or hot cocoa in. It even has marshmallows and whipped cream dies.


Stitched Hillside Pop-Ups (Lawn Fawn)
I always wanted to make my own pop-up cards and with this die it's really easy. It's pretty expensive, but it's definitely worth the money. With only one pass of your die cutting machine, you create these pop-up hills. That's pretty much the base of your scene and you just have to add your images and sentiment to it.


Leafy Tree Backdrop: Landscape (Lawn Fawn)
Also a great scene builder, that can be used all year long. Because the leafs come seperate, you can add them or leave them out depending on the season. This is the landscape version, but there is also a portrait version.


Goodie Bag (Lawn Fawn)
This is a fun way to present your gift. This fits a gift card perfectly. But it's also great for parties or as decoration.


INKS:

Merman Ink & Wild Rose Ink (Lawn Fawn) + Cracked Pistachio Ink & Worn Lipstick Ink (Distress Ink)
The most beautiful colors to work with and the also combine. See a pattern here, they are very similar colors.


Fun fact: Most used stamp sets of 2016: Toboggan Together (Lawn Fawn) and Cat-Itude (My Favorite Things). I used both of them for 8 cards this year.

Thanks for visiting my blog. Please leave a comment and follow/ subscribe to my blog!

woensdag 21 december 2016

CRAFTY HAUL (9)

It’s been a while since I bought craft supplies. I only bought a couple of things, all from lawn Fawn. Some older products, but also one stamp set from the newest Lawn Fawn release.


The Tiny Tags are ideal to make your presents look amazing. There are four different shapes and they all have this fun stitched edge.

From the new Lawn Fawn release there were two items I really wanted. I managed to only buy one of them and I choose the Love Letters stamp set. It’s so adorable and I love how you can stamp the little sentiments on the letter. Or the speech bubble inside the phone. Seriously, how do they come up with this?

The Critters in the Forest stamp set is an older set and I got it second hand for a fair price. The set has some of my favorite animals, like a fox and an owl. But my favorite stamps are the raccoon and the tree.

I really like all these stitched stackables that Lawn Fawn has, but they are so expensive. So I decided to create my own stitched shapes, by buying the Stitched Borders dies. It has a cross stitched, dotted, regular stitched and a stitched border at an angle.


Thanks for visiting my blog. Please leave a comment and follow/ subscribe to my blog!

THANKS (4)

Sometimes I buy stamp sets or die sets from other crafters, who don’t need them anymore. I got the Critters in the Forest stamp set from Lawn Fawn second hand from a crafter who happened to have two of them. She never used it before and I bought it for a very reasonable price. I made this thank you card with it.


I started by stamping all the images I wanted to used. The raccoon, the fox, the owl, the log, the little mushroom and the tree (twice). I colored all the images with Copic Markers. Here are the colors I used:
Tree: BG93 – BG96/ E25 – E29
Tree Trunk: E25 – E29
Fox: E08 – E29/ E41 – E43
Raccoon: W2 – W5 – W7
Owl: E41 – E43/ E57 – E29
Mushroom: R22 – R35/ YR000 – YR00


I fussy cut all the images. I trimmed a rectangle from dark blue cardstock. I die cut two grassy borders with the Meadow Borders dies from Lawn Fawn, from green cardstock. Then I adhered everything. The back grassy border, the left tree, the log, the owl, the mushroom and the raccoon were adhered flat. The rest with foam tape.

Because the card is pretty busy, I wanted a small and subtle sentiment. I took the Happy Days stamp set from Simon Says Stamp and used the speech bubble. I added the word thanks to it. I stamped it on white cardstock, so it will really pop against that dark background. I fussy cut the speech bubble and added it to the card with foam tape.


After adhered the panel to a beige cardbase, I rounded off the top right corner with the We R Memory Keepers Corner Chomper. And that’s my card.

Thanks for visiting my blog. Please leave a comment and follow/ subscribe to my blog!

HAVE YOURSELF A MERRY LITTLE CHRISTMAS (1)

Okay, so this is really my last Christmas card of the year. I didn’t make it for a specific person, but I did make it for the Lawnscaping Challenge. The LAST one, which is so sad. I always loved participating in those challenges. The theme was Christmas and I created this card with the Happy Howloween stamp set from Lawn Fawn.


I started by stamping some images, from various Lawn Fawn sets. I used the dog and the bones from Happy Howloween, the presents and the santa hat fromToboggan Together and the tree is from Critters in the Forest. I stamped the bone several times into the tree. I colored all the images with Copic Markers. Here are the colors I used:
Tree: BG93 – BG96/ E25 – E29
Bones: E41 – E43
Dog: E25 – E29
Santa hat: R14 – R46
Presents: BV000 – BV02/ BV13 – BV17


I fussy cut and die cut all the images. Then I trimmed a light purple rectangle and I wanted some stitched edges. I took the cross stitched border die from the Stitched Borders die set, from lawn Fawn. I die cut a snowy hill from white cardstock, using the Stitched Hillside Borders. I stamped the sentiment, from Merry Messages, onto the hill. I used two Lawn Fawn inks, to give the sentiment an hombre look. I used Fresh Lavernder Ink and Sugarplum Ink.


I adhered the snowy hill to the purple panel with foam tape and stamped some snowflakes in Yeti Ink on the background. The snowflakes also come from the merry Messages set.

I adhered all the images, but the presents, with foam tape. The panel was adhered with foam tape to a very light yellow cardbase.

Please make sure to check out the last Lawnscaping Challenge, maybe you can participate.


Thanks for visiting my blog. Please leave a comment and follow/ subscribe to my blog!

dinsdag 20 december 2016

CHRISTMAS TAGS (1)

An example of jazzing up your Christmas presents in the most easy way possible, using the Tiny Tags dies and the Tiny Tag Sayings stamp set from Lawn Fawn.


I die cut the tags, the set has four different ones. A heart, a star, a scalloped circle and a scalloped square. They all have stitching detail on them. I die cut them from kraft cardstock, because it matched the wrapping paper of my presents.


I stamped different sentiments on each tag, they can be used for Christmas but also other occassions. On the back I stamped the "to-from" words. There are also a few different variations in the stamp set.

After wrapping my presents, I added some inexpensive ribbon to them. I tied the tags to the ribbons.

I'm not a good gift wrapper at all, but with these cute tages you will make every present look amazing!

YOU'RE ONE OF A KIND (1)

I haven’t used the Magical Unicorns stamp set from My Favorite Things that often yet, so it’s about time to create a card with them again. I went for a friendship card.


I started by stamping the images. I stamped one of the unicorns, the castle, the rainbow and the big and small cloud. I colored the images with Copic Markers. Here are the colors I used:
Unicorn: W0 – W2
Hair: BV000 – BV02
Castle: YG41 – BG34/ W0 – W2 – W5/ BV000 – BV02/ R14 – R46
Rainbow: R14 – R46/ Y17 – YR16/ B02 – B05


I fussy cut the images and went over to the background. I trimmed a rectangle from white cardstock to function as my panel and sky. I took Salty Ocean Distress Ink and blended it onto the panel. I used a light hand. I took another piece of white cardstock and die cut a cloud, with the Puffy Cloud Borders from Lawn Fawn. From green cardstock I die cut grass, with the Meadow Borders, also from Lawn Fawn.

I adhered the two fron grassy hills with foam tape, the other grass part and the clouds were adhered flat. All the stamped images were also adhered with foam tape. I added some glitter to the horn of the unicorn, where I used the Spectrum Noir Silver Sparkle Pen. For the rainbow I used the Spectrum Noir Clear Sparkle Pen.

I stamped the sentiment in Versamark Ink and heat embossed it with Opaque Bright White Embossing Powder from Wow. I used a black strip of cardstock and adhered it with foam tape to the card. I adhered the entire panel onto a white cardbase, with foam tape.


A card with lots of dimension.

Thanks for visiting my blog. Please leave a comment and follow/ subscribe to my blog!

zondag 18 december 2016

HAVE A MAGICAL HOLIDAY SEASON (3)

I used the Winter Unicorn stamp and the Shooting Star die for this magical Christmas shaker card.


I die cut a rectangle from dark blue cardstock, using the Wonky Stitched Rectangle STAX from My Favorite Things. I also die cut a star from this panel, with the Shooting Star die from Lawn Fawn. This star is going to be the shaker element of the card. From white cardstock I die cut clouds, with the Puffy Cloud Borders from Lawn Fawn. On this cloud, I stamped the sentiment from Merry Messages. I stamped it in Merman Ink.


I stamped the unicorn image and colored it with Copic Markers. Here are the colors I used:
Unicorn: C0 – C2
Hair: YG41 – BG34
Scarf + horn + hooves: R22 – R35


I fussy cut the image and started assembling the card. I added a double layer of foam tape to the back of the card, around the star (where I adhered some acetate on before). I put some star shaped sequins into that section and put a white piece of cardstock over it. I adhered the entire panel onto some pattern paper, from the Perfectly Plaid Winter pack by Lawn Fawn. I added the panel to a white cardbase and applied some glitter to the horn, using the Spectrum Noir Clear Sparkle Pen.

Thanks for visiting my blog. Please leave a comment and follow/ subscribe to my blog!

HAPPY HOLIDAYS (3)

The Jump For Joy stamp set from Lawn Fawn is a fall themed set, but I used it for a Christmas card. I combined it with the Leafy Tree Backdrop: Landscape.


I did the scene first. I die cut the tree from brown cardstock. I trimmed a rectangle from some aqua cardstock and also two hills from white cardstock. I used the Stitched Hillside Borders for that. I stamped snow onto the aqua cardstock, with a stamp from Snow Cool using Yeti Ink from Lawn Fawn. On the shortest hill I stamped the sentiment from Merry Messages. I used Merman Ink for it.


I adhered all these elements together. The tree and front hill I adhered with foam tape, the rest flat.

I stamped all the images. I used the fox, hedgehog and owl from Jump For Joy. I also used the santa hat and the snow balls from Toboggan Together. I colored the images with Copic Markers. Here are the colors I used:
Fox: E08 – E29. E00 – E11
Hedgehog: E25 – E29/ E00 – E11
Owl: W0 – W2 – W5 – W7/ YR15
Snow balls: CO Santa hat: R46 – R59


A die cut and fussy cut the images and I could start assembling everything. I adhered all the stamped images onto the card with foam tape, except for the hedgehog and the stack of stnow balls.

I love how you can stretch all these stamp sets.

Thanks for visiting my blog. Please leave a comment and follow/ subscribe to my blog!